|
What have I been up to lately?
|
|
|
|
Well, I haven't been idle...
|
|
|
01-02-02, Part 9: Dyno time
12-11-01, Part 8: In tune!
10-17-01, Part 7: Back on the road
08-04-01, Part 6: Oh-so-close...
03-30-01, Part 5: Delays; a baby is born; more delays; more money is spent
01-21-01, Part 4: The new engine roars to life!
12-17-00, Part 3: The new motor comes home
11-18-00, Part 2: My money flowed like wine...
10-20-00, Part 1: I need a new motor...
Fall 1999/early 2000 mods
|
|
|
02-25-02, Part 10: More drama
Well, it seems that not everything was happy in turboville. The headgasket melted (!!) between the #1 and #2 cylinders, and this caused a chain of events that ultimately resulted in a detonated piston. Miraculously, the broken piston left the combustion chamber without damaging a valve or a cylinder wall; it made a clean escape. Unfortunately, it lodged itself in a narrow part of the turbine housing, killing both my turbine wheel and turbine housing:
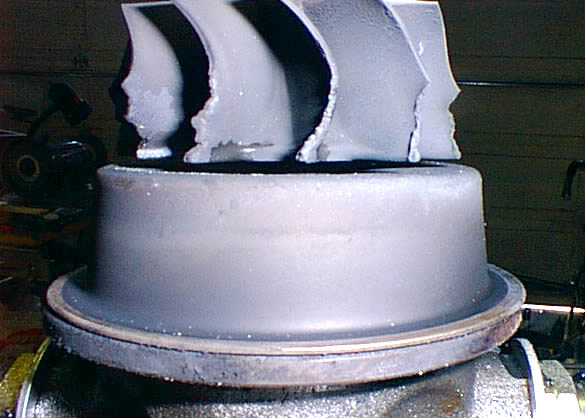
That part on the bottom half of the turbine blades that looks all chewed up? Well, it shouldn't...
The upshot is that the motor is down again for a rebuild while we replace the broken piston. I guess this is an opportunity to correct a few things I didn't get right in the initial build up...but that doesn't make it feel a whole lot better. While the motor is down this time, I will be doing the following:
-
installing a set of Eagle 4340 steel rods.
-
reshaping the combustion chamber to bring the compression ratio down to a more boost-friendly 8.1:1. This will let me run more boost AND more timing, both of which are good things.
-
relocating the O2 sensor bung from the mid-pipe to the down pipe.
-
changing the wastegate spring to a much lower value (3-5 psi) so the electronic boost controller will have more control.
-
resurfacing the flywheel and changing to a stronger clutch, as the current combo showed signed of slippage.
I'm trying to remain philosophical about this, but it sure ain't fun spending a ton of money and putting in a year of effort only to have parts fail. Unfortunately, I don't think this is unusual when you try to get double the stock power output. Every single detail becomes important, and the smallest detail can trip you up. Financially, I am poorer for the experience, but I am otherwise undeterred: I will solve these problems, the motor will go back together, etc. But it does suck to be in this position yet again.
On the morning when things went bad, I made an adjustment to my BOV to get it to open at a lower threshold. I don't think this adjustment had anything to do with what followed, except for the fact that it may have masked some of the other things that were going on.
After making this adjustment, I was feeling good about how the motor was running. In low boost situations, the BOV was now opening when I closed the throttle plate; previously, I needed 6 or more pounds of boost present to get the BOV to crack open, so this was definitely an improvement. Driving to work that morning, it seemed like things were running really well: upshifts were crisp and the motor was accelerating a little better than usual. I attributed this to the BOV adjustment, but I now believe it was due to an exhaust leak between the mid pipe and the exhaust pipe.
I was on the freeway on my way home from work when things went bad. I always scan my gauges when I drive, and I distinctly remember that the EGT was no higher than normal. My water temp gauge had been running a little odd, intermittently reading just a few degrees higher than normal, but it was reading fine when I suddenly noticed that the motor was pinging *a lot.* I had the music up and wasn't paying attention, so I didn't catch this immediately. By the time I pulled over, the motor was running like crap. No changes to the temp gauges, no white smoke, but something was clearly wrong. I didn't see anything obvious but didn't want to chance it, so I shut the motor down and called for a tow (gotta love AAA "Membership Plus" towing privileges :-).
When I got home, I had a chance to go over the engine more thoroughly. The first thing I noticed was that I had lost some downpipe flange bolts, and my mid-pipe was only attached to the down pipe by a single bolt -- there was a big 1/2" gap between the two pipes. I then pulled the plugs, and saw right away that #1 plug was physically damaged: the ground electrode was bent and pushed to the side of the insulator nose, and the insulator itself was cracked. U-g-l-y.
Next, I did as compression test, followed by a leakdown test. The compression and LD test revealed that the #1 & #2 cylinders were Siamesed, as were cylinders #3 & #4. Hmmm...
At this point, I called my engine builder (Tim J.) and discussed the situation. Since it seemed clear that "something bad had happened," we decided that it would be best to pull the motor and ship it to him for a tear down inspection and rebuild. At worst, I would be out the effort of pulling the motor and the cost of shipping the motor (plus a couple hundred bucks in rebuild supplies). But since I was certain something more severe had happened, I wanted to be as thorough as possible. I could have torn the motor down in my garage, but since this motor is something of a rolling advertisement for Tim's services, Tim wanted to take ownership of the tear down/rebuild, which was fine with me.
What Tim found when he pulled the head was that the headgasket had melted away between #1 and #2 and also between #3 and #4. Neither the head nor the block was scored or otherwise damaged by this!!! Wild, huh? Tim said he had never seen anything like it, and neither have I...but it is as I've described it. Additionally, a big chunk of the top ring land was missing from the #1 piston, as was the entire top ring. Tim described it as missing roughly 25% of the top ring, from about the 3:00 to the 6:00 position, as viewed from the front of the engine. Much to our surprise, the missing piston piece did *NO* damage to either the head, valves, or the cylinder wall, but as I mentioned, it did manage to damage an expensive turbine wheel. I am actually very lucky, because it could have wreaked considerably more havoc in the block and still taken out the turbine. Not exactly the kind of luck you want to take to Vegas, but I guess it's better than it could have been.
So that's what I know at this time. The piston damage was obviously caused by detonation, but the headgasket probably failed over a longer period of time. My supposition at this point is that the headgasket became damaged during one of the tuning sessions, and the detonation occurred when the computer corrected the A/F to compensate for the exhaust leak, and this finally put things over the edge.
Anyway, I'll post more when I know more, but that's what I know now. A big motor making big boost is going to chew up some parts, and I guess mine is still teething. Grrrrrrrrr.
|
|
|
|
|
|
Part 9: Dyno time (01-01-02)
I'm now zeroing in on the right setup for the street. With Dan Fodge's help, we did a pretty good job of getting the engine tuned, as described in Part 8. Our initial tune was conducted with the cam 2º retarded. After driving that around a bit, I decided that cam timing put the powerband too high up for my gearing and driving taste -- i didn't have as much bottom end torque as i wanted, and the engine would pull like crazy from 80 mph to 100 mph. Surprisingly enough, I don't really want to drive 100 mph all that often, so I advanced the cam 4º from that position (making it run 2º advanced), and drove that around for a bit. We didn't readjust the fuel tables, just took a couple of degrees of ignition advance off the higher cells in the spark table, as the increase in cylinder pressure caused a little pinging. Interestingly enough, the engine still didn't feel right with the cam advanced like this -- it felt like it was fighting itself a bit. So I moved the cam back 2º, so that it was straight up -- no advance/retard -- and this appears to be the winning combination. With the cam installed in this position, I made an appointment to meet Dan at Ralph Gobel's Hot Rod Heaven in Sacramento for some dyno tuning, to see if we could tweak the fuel and spark tables for a bit more power, and to find out what sort of power we were making on paper.
Since I tend to be wordy as hell in these updates, I'll just cut to the chase here: the dyno session was very worthwhile, as we found another 30 hp by increasing the fuel and turning up the boost.
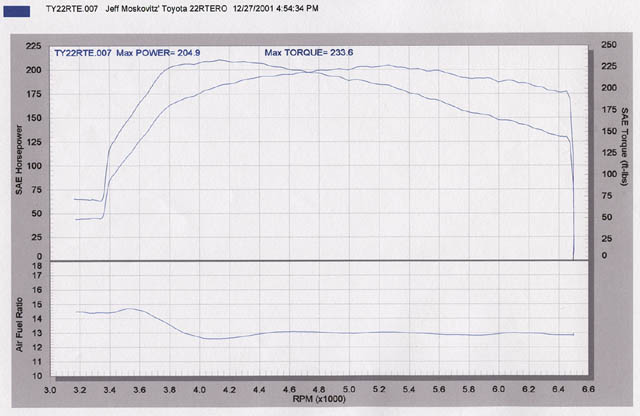
The punch line: 205 hp, 233 ft. lbs. of torque to the rear wheels @ 12 psi
Now, as some of you will note, this isn't a whole lot different than the numbers I pulled back in October.This makes sense, as I'm running the same amount of boost (12 psi) as I was back then. What is different is that this curve is nice and broad, and the engine doesn't ping at all. These numbers were achieved with a 69% duty cycle on the 550 cc/min injectors, running 91 octane gas. The quality of the gas is the real buzz killer here, as I know I could run more boost and timing with better juice. Still, it's important to me that this motor be tuned to run on pump gas -- no race fuel or water/alcohol injection for me. I want to get the most power that I can from fuel that's readily available, without having to resort to additives or other half-measures. Since the max safe duty cycle for the injectors is around 80% - 85%, I still have some room to grow, and I think that a richer mixture and some additional boost will yield another 20 - 40 rwhp. Eventually, I'd like to be able to run 15 psi, which I think will just about max out my injectors.
So that's where things stand now. The engine is running *great* -- I'm seeing 15 mpg in the city, and 17 - 19 mpg on the highway, when I can keep my foot out of it. These are very close to my numbers with the stock CT20 turbo, believe it or not. It starts right up and idles very smoothly. It's a bit loud, as one would expect with a 3" exhaust, but not obnoxiously loud, and it doesn't sound tinny or "ricey" in any way. It sounds like a healthy truck, which is what it is. Oh, and it pulls hard, and is an absolute blast to drive :-)
Now to finish the stereo and get the interior back together. When I get a chance, I'll post copies of my Speed Pro tuning files anmd some screen shots of the fuel and spark tables, as I think people will find them to be of interest. I'll also keep polishing these tables, and edging up the boost. I may not make the 300 rwhp that I had set out to make, but that's just a numerical goal, anyway. The chief purpose of this was to build a rock solid engine that made a bunch of power, and was very fun to drive (while not sacrificing any reliability). It's taken a lot of time to reach this point, but I am pretty happy with the results to this point. Stay tuned as I see if I can take it further.
|
|
|
|
|
|
Part 8: In tune! (12-11-01)
Wow -- almost two months have gone by. Time for an update.
First things first: As you may have surmised by the cam timing article, I am now running a different cam. This is not a knock against the C270, just an acknowledgement that the C270 is optimized for the stock AFM/ECU combo (little overlap, relatively short intake duration), and I am pretty far beyond that setup. Besides, the C270 was creating too much cylinder pressure, which was leading to pinging, which was something I wanted to avoid. So on Gary Meissner's suggestion, I gave the CompCams 260S a try. Impressions: nice cam, turbo friendly, and decent low end torque. Doesn't have quite the low end torque that the C270 did, but it more than makes up for it in top end power. I am currently running it 2º retarded to take advantage of the high flowing cylinder head and exhaust. I may change that, but it seems to make sense for now.
OK, with the new cam installed, and the detonation problem addressed, it was time to get this sucker tuned. Almost exactly a year had gone by since I picked up the new motor, and several months had gone by since I made a first attempt at tuning it. The time had come to bring in a ringer: someone who knew what he was doing, preferably with my particular computer (Speed Pro).
Well, December 10th was the day: I took the day off and drove the two hours or so out to Elk Grove, CA, to meet with Dan Fodge, the only authorized Speed Pro dealer/installer in Northern California (and a former Formula 5000 race car builder/driver). It was an interesting afternoon, one that produced some great results.
First, I should say that even though I was really looking forward to this day, I was also very apprehensive about getting the truck tuned, because I had no idea how skilled or knowledgeable Dan was -- he came recommended by the folks at Speed Pro (now Fuel/Air/Spark Technologies), but I didn't know if that meant that he had gone through one of their training courses or had merely bought into their dealership network, or what. Furthermore, I was more than a little apprehensive about tuning the engine for max power -- if I was gonna break something, it seemed to me that this would be a good day to do so.
Luckily, Dan turned out to be one of the most knowledgeable automotive professionals I've ever met. His shop, in a nondescript industrial park in a very nondescript Central Valley city, doesn't have any sort of identification on the outside -- no lettering in the window, no banner, no nuthin'. When I passed through the office he shares with his son, I stepped into some sort of automotive fantasy land: the shop is spotless, with tidy little tables adjoining milling machines, toolboxes, and a heady selection of exotic cars and hardware. In the front of the first bay is a 427 Cobra replica -- not the cheesy fiberglass kind, but the aluminum bodied knock-off that Carroll Shelby Enterprises produced in limited numbers. It's being fitted with four pairs of individual EFI throttle bodies, shaped to look like Weber IDE carbs. These are not the pieces that TWM sells, but some custom throttle bodies that Dan has machined himself. In fact, milling custom throttle bodies seems to be one of his specialties, and his shop had an impressive collection of updated versions of classic Hillborn pieces, as well as some very slick one-offs, including some FUCKIN' MASSIVE bazookas grafted to a big block Chevy intake manifold.
Anyway, sorry for the digression...just wanted to set the stage...
So happily, Dan turns out to be the embodiment of automotive knowledge. After a quick look-see under the hood, he grabs his computer, settles into the passenger seat of my truck, and plugs into my ECU. And here's where we run into the one problem that plagued us the whole day: my ECU is reporting that something funky is going on w/my wideband O2 sensor, and we can't seem to clear the trouble code. After trying various combinations of harnesses, sensors, and finally a replacement ECU, we determine that the trouble is with my ECU, and proceed to hook up a "stunt double" ECU so we can at least get the engine tuned. I will need to send my ECU off to the manufacturer to get it repaired, but finally we start the engine and get busy tuning.
In 5 minutes in front of his shop, Dan is able to clear out the mess I had made of my idle tables, and has my motor idling like a kitten at 850 rpm. We now drive over to a nearby frontage road, and begin to tune in earnest. This road has a very straight section that's about 3/4 of a mile in length. We begin to head up and down this stretch, me driving, Dan working the laptop. Things quickly begin to take shape. Dan doesn't speak much, and when he does, it's usually things like, "bring the revs up more," "step on it," and "hold it steady there." He gets a rough fix on the fuel table in about 15 minutes, and then a rough fix on the timing table in 10 more minutes. We play around with boost a little, and opt for less boost in favor of more timing. Then it's maybe another 10 minutes fine tuning.
By now, I am seriously wondering how he can possible use this stretch of road, which parallels the highway, for runs of this speed. I am easily hitting 95+ mph in 4th gear, and the engine would certainly go higher if I had more room and more confidence that I wasn't going to get pulled over at gun point. (Dan later tells me that he has taken some vehicles to almost 200 mph on this stretch of road, something I can't really dispute...) Anyway, by now the truck is running GREAT! I can march through the gears very solidly, and third and fourth pull STRONG, with LOTS of top end power right up to my arbitrary redline of 6500 rpm. (I have the cam 2º retarded, which I may need to change...) And it feels good! The temp gauge is happy, the intake air temp is a mild 110* F at WOT, and the EGT gauge is screaming...about which Dan is unconcerned ("It'll take it," he offers with a knowing half grin.) Anyway, after maybe 45 minutes of actual driving, we have the engine tuned better than I could have managed in a week of intensive effort. Even Dan agrees that the engine is running great, praise I can't take for granted given the other cars he's got sitting around his shop. I rank this as one of the single best purchases I have ever made for this engine project, and that's saying a lot!
We cruise back to his shop and swap my ECU back in. Of course, even with the same program, the thing isn't running as well as it was with his ECU. We think this is due to the intermittent problem with the O2 sensor (he did all of this tuning in open loop mode, so the sensor isn't a direct part of the feedback to the ECU, but there's probably some other circuit that's also affected by the same voltage drop we were seeing on the O2 sensor). Still, the truck is running lots better than when I brought it in, just not as well as it was when I was running the fully functional ECU. I agree to ship the ECU off to get it repaired ASAP, and he promises to help me retune things at no additional charge if the repaired ECU doesn't perform as well as the one from his shop. I hope to have it back by the end of the week, so maybe I'll get some closure on this engine "real soon now."
Anyway, sorry to be so long winded, but as you can tell, I'm pretty jazzed by this. The engine project is finally (FINALLY!!!) within spitting distance of being done, almost 14 months after I pulled the old engine out, and one year after I got the new engine back from Tim. Once I do have it running properly from my ECU, I'll get it dyno'd one more time, just to put up some final numbers. My gut feeling is that I am seeing 250 - 260 hp at the rear wheels at ~12 psi of boost, which is less than I had hoped, but this is as much a limitation of the 91 octane squirrel pee they sell as premium in California as anything else. And it IS plenty of fun to drive: it sure does haul ass, which is the most important thing :-)
So that's where things stand. Expect one more installment in a few weeks and some final (God willing!!!) dyno numbers, and I'll call this sucker DONE!
|
|
|
|
|
|
Part 7: Back on the road (10-17-01)
Well, after almost exactly one year and a boat load of money, I finally have the engine back on the road!
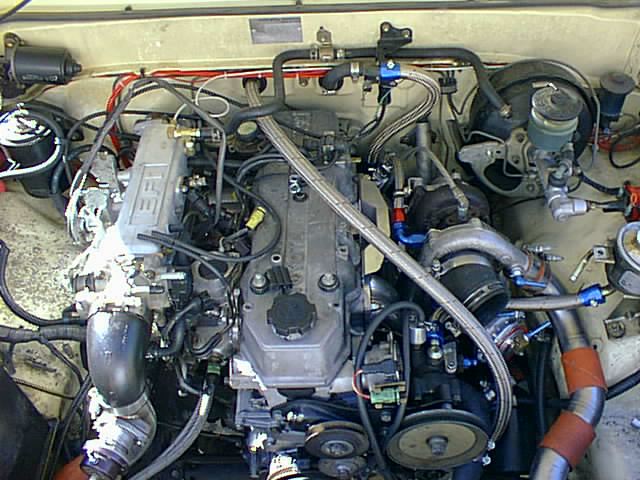
Here are a few shots of the beast:
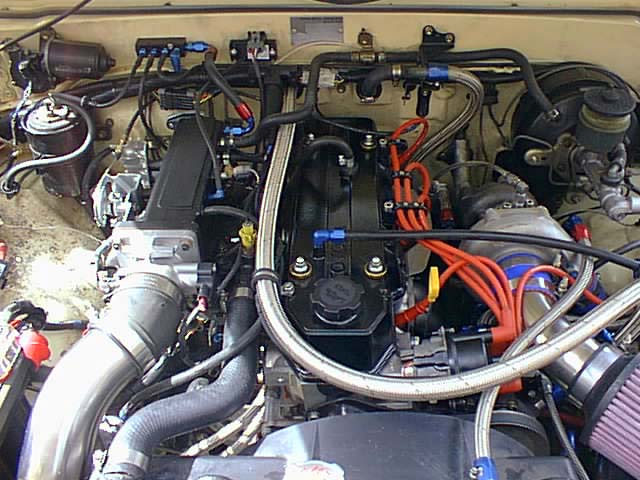
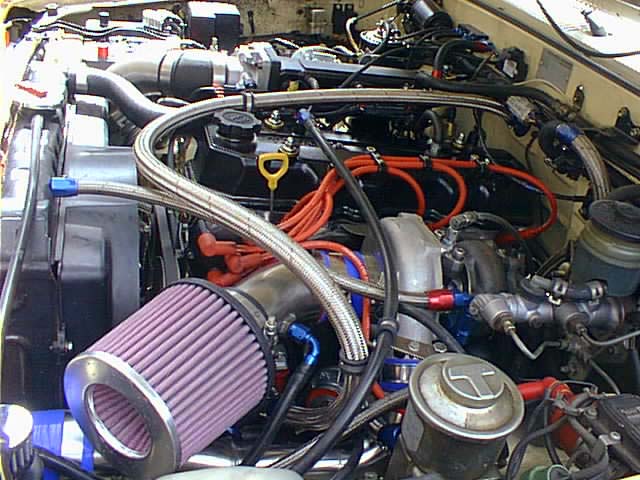
I gotta say, it came out as nice as I had hoped it would. It just took an impossibly long time to get this truck to this state, and there's still a lot more to be done.
But first, some initial dyno numbers:
Max HP, as measured at the rear wheels:
|
206.1 @ 4600 rpm
|
Max torque, as measured at the rear wheels:
|
250.4 ft. lbs @ 3300 rpm.
|
All measurements at 12 psi boost
|
OK, so I'll admit that I was hoping to see 300 hp straight out of the blocks, but actually these numbers are pretty respectable, as I still have a lot of tuning ahead of me. But these numbers are in the ballpark, and, assuming a 20% driveline loss, come out to 240 hp and almost 300 ft. lbs. of torque at the crank.
The good news is that the truck is remarkably streetable: it drives very nicely, and moves very quickly when you put your foot in it. The bad news is that it should be making more power than it is, and I'm not sure why it isn't. Of course, it will make more power if I turn up the boost, which I intend to do once I get a better handle on the fuel table. But I think it should be making more power now, at 12 pounds of boost, and I have a couple of theories as to why it isn't.
Theory #1: The exhaust is now undersized. When I get a scanner and post the first dyno results, you'll be able to see that the power curves sort of taper off. This is unusual for a turbo engine, as you'd expect it to keep making more power the faster it turns. So one strong possibility, in my opinion, is that the 2.5" exhaust is just getting too choked up to flow adequately above 200 hp. I'll be taking care of this straight away, as I have ordered the parts to make up a mandrel bent exhaust out of 3" 304 stainless steel, with a new 3" magnaflow cat and "Wide Open" muffler. I hope to have this in before the end of October.
Theory #2: I have some cam issues I need to resolve. I may have some problems with my cam timing, and/or my cam is simply not optimal for a non-stock EFI system. I have a degree wheel on order, and hope to get to the bottom of this real soon. I may also swap out the DOA C270 cam in favor of a CompCams 260S, which has a longer intake duration (while still being basically a truck cam). Again, I hope to get to this real soon, as i'd like to do some more dyno testing in the coming weeks.
So that's where things stand right now. Mostly, I just need to spend some time driving it around (I have less than 200 miles on the engine with the new turbo and all the other goodies). So look for a more detailed update in the next week or two, once I have a better grasp of what the motor is doing.
|
|
|
|
|
|
Part 6: Oh-so-close...(08/04/01)
OK, you'd think by now that I'd have the damn engine done and would already have thousands of miles on it. And really, I should have had this thing done months ago...but it hasn't worked out that way.
For anyone who's thinking about having a baby AND building a complicated, high-performance engine at the same time: forget it. It's one or the other, kiddo, and it's usually the one with the dirty diapers that gets the attention ;-)
Still, I have found some time to work on this, and it's really close to being ready to start. The added delays have given me more time to screw with stuff, though, and this has lead to two significant additional modifications: a new throttle body and a new intercooler.
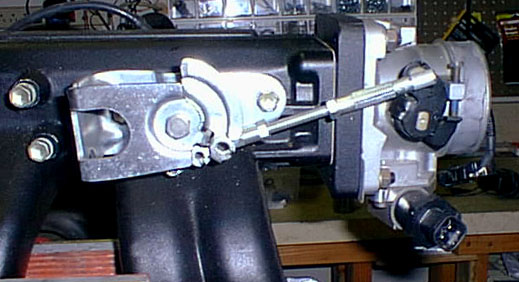
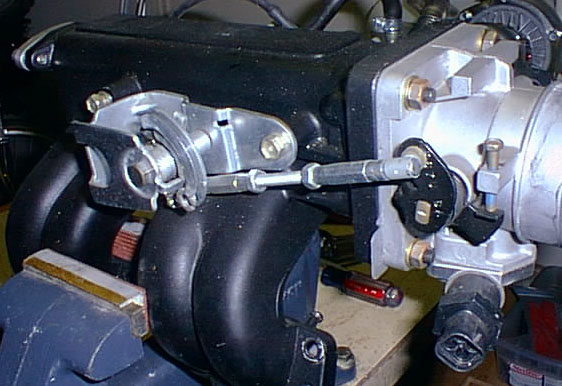
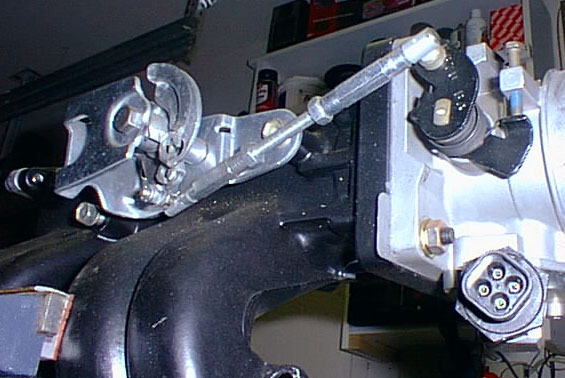
The throttle body is a monster 65MM piece from a 5.0L Ford Explorer. (BTW, you want to use the Ford Explorer TB over a 65MM Mustang TB because it's much easier to graft the Toyota linkage to the Explorer linkage.) Because I'm using a Speed Pro ECU, I can run the Ford TPS, which makes this a lot less complicated. In fact, I don't think you could get away with this swap using the stock Toyota TPS unless you fabricated a very clever little interface between the TPS and the TB. Glad I didn't have to do that...
Anyway, the new TB looks like this:
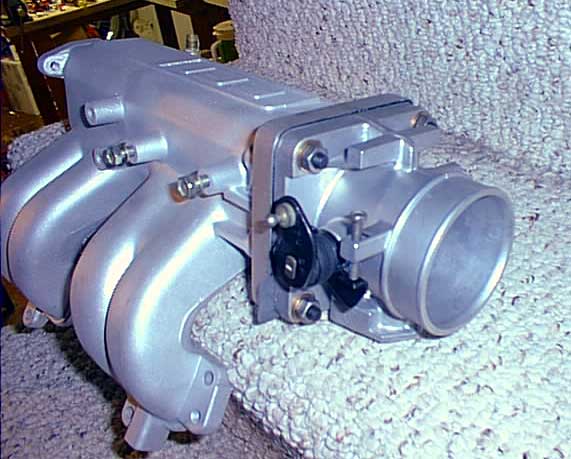

THAT should move some air :-) As an added bonus, the Speed Pro can control a GM idle air control (IAC) motor, which is adapted to the Ford TB via a neat little billet adapter, so my idle should be pretty smooth...if I ever get around to starting this thing. [5-13-2002: after a few requests, linkage pics are here: linkage1, linkage2, linkage3.]
The second mod was a switch to a bigger intercooler. No pics yet, but I'll have plenty of pics up soon. This intercooler is about the same physical size of the old one, but it's about 1.5" thicker, and it features 3" inlets/outlets. This has allowed me to step up to 3" intercooler pipe for most of the system. Hopefully, this will be the benefit that I'm imagining it to be. My old intercooler had about a 2 psi pressure drop across the core, and I expect the new intercooler to be *much* better in this department, probably coming in at about .5 psi. Less pressure dropped = quicker response and greater effeciency.
So where do things stand now? Well, everything in the engine is installed except for the vacuum lines, which need to be recut, and some final bits of wiring. It's really all-but-done, and it looks great, too. So why isn't it running? Because I decided that I also wanted to upgrade the stereo and install an alarm, projects I'm almost done with. If I can find a couple of days worth of time -- 10-20 hours, max -- I think I can have everytthing done and finally get this thing running. But like I said up top, it's really hard to find the time with a 5 month old at home. And it's not like this is the only thing I have on my plate, either -- I have a pretty full life, and as a result this project has just sort of slipped away from me. But I'm gonna get it done reeeeeal soon now. I promise ;-)
Anyway, for anyone who's followed along with things this far, please continue to be patient. Someday soon this engine will roar back to life, and it should be making a *boatload* of power when it does.
|
|
|
 Part 5: Delays; a baby is born; more delays; more money is spent (03/30/01) Part 5: Delays; a baby is born; more delays; more money is spent (03/30/01)
Well, it's been two months since I last updated this report, so I might as well bring things up to date.
When we last left off, I was just about to take the engine into the dyno shop for some tuning and testing, with the hopes of putting the wraps on the engine project. Unfortunately, a whole bunch of stuff happened before I could do that.
The first significant event
The first significant event took place on the night of Sunday, February 25, as I was giving the truck One More Test Drive before I took it into the dyno shop the next day. My intention was to do a few high speed runs on the freeway, just to make sure that things were running as they should be --no sense racking up several hundred dollars of dyno time unless I was sure the engine was running right.
The test drive went OK, but as I was pulling back into my neighborhood, I noticed that the truck wasn't running too well, and, oh shit, is that a big plume of white smoke from my tailpipe???
Convinced that I'd popped the headgasket, I limped into the driveway in a miserable a mood. "How could I have blown the headgasket?" I wondered. "Wasn't O-ringing the block supposed to solve all of my headgasket problems??" And yet, I couldn't ignore the big plume of white vapor emanating from the tailpipe. O-rings or no O-rings, something wasn't right, and I was screwed; there wasn't going to be any dyno session until I fixed what appeared to be a bad headgasket.
In a frenzy, I gathered the things I would need to change out the headgasket the next evening. I wanted to get the head off, change the gasket, and get the head back on as quickly as I could, because my wife was 8+ months pregnant, and although the baby wasn't due for another two weeks, I knew I didn't have a whole lot of time left to dick around with the truck.
The second significant event
Now, "prescience" is the ability to know the course of events before they occur, and "irony" is the disconnect between how you expect things to work out and how they actually work out. What happened next was very ironic, but in the back of my mind I knew it would happen this way; I had spent too many months working on this engine to have it turn out any differently.
On Monday evening, I began tearing the top off the engine. Because I was trying to work quickly, I was using whatever space I could find, and the driveway was soon filled with tools, manifolds, and an engine hoist -- you can guess the scene, just a whole bunch of crap spread out everywhere. And me in the niddle of it, trying to change things out as quickly as I could, up to my arms in my engine's internals.
I started at about 5:00pm, and by 7:30 I had the head lifted up with the hoist and was beginning to get the old gasket sealant off the block and head. I didn't see anything particularly wrong with the old gasket, but couple of the head studs had loosened, so maybe that was the cause of the leak? In any event, a cursory examination of things indicated that the number two cylinder was where the trouble started, so maybe a new gasket and a careful reassembly, followed by a lot of post-op torque checking, would be all the patient needed.
At about 8:00 pm, in the midst of this chaos, my wife came downstairs and told me in a very quiet voice, "Jeff, I think my water just broke..."
Suddenly, the headgasket was about the last thing on my mind -- it was time to clean up my mess as best I could and get her to the hospital!
OK, I apologize for making this story so drawn out, but the whole flow of these events is etched so strongly in my mind that I have a hard time condensing it. Somehow, in the following 15 minutes, I did manage to get the entire driveway cleaned up, get the hood back on the truck, and disassemble the (rented) engine hoist and store it in the back of our old car, so that someone could return it the next day. I also managed to clean myself up, throw some things in an overnight bag, and carefully walk my wife down the stairs and begin the drive to the hospital. But I really have no recollection of doing those things, and no clue how I managed to do them so quickly.
Still, we checked into the hospital at 8:30 pm (!), and by 8:30 the following morning (8:17, actually) our son Aaron had been born. Everyone was healthy, and tired, and excited, as you would expect them to be. And the truck and its problems were pretty far from my mind.

Li'l Aaron, in an unusually quiet moment
What happened next
As you would expect, things have not been moving forward with the same sense of purpose and determination since Aaron came into our lives. Time is something I just don't have any more. Still, I have managed to get a few things done.
After reassembling the head with a new headgasket, and experiencing the same (if not worse) symptoms, I determined that the head is cracked. Because we used my old 150k mile head, I am not really surprised. We had it pressure tested before we did all of the work, but I think the stress of the new internals (especially a set of rings that actually sealed) were just too much for it, and we revealed some new flaw in the head that probably would have asserted itself earlier if it had had the opportunity.
To fix things the right way, I bought a new head (literally: a brand new casting from Toyota), and decided that as long as I was going with a new head, I might as well approach it like I've approached the rest of the engine: big-as-they-come Ferrea 48MM and 40MM valves, new bronze guides, and a full-on port and polish from DOA. Hey, in for a penny, in for a pound ;-) As I write this, the head is still in Tim's hands, but I hope to have it in another week or two. There will be pictures and a full report on the new head in Part 6 next month.
Since I did manage to get a few miles on the new engine before things fell apart, I had the chance to evaluate it's performance with the new computer and other new pieces, and I was not as swept off my feet as I had expected to be -- it was quicker, certainly, but it didn't seem to be making significantly more power than the old mill. As you can imagine, this was very disturbing, but I thought about why this might be. The engine had more compression, so it should be quicker, but if I wasn't moving considerably more air through it, it wouldn't be making considerably more power. My suspicion was the turbo, which I had purchased the previous year and had sized for the stock compression and factory computer, was just too small for what I wanted it to do. When I had ordered it, I told the tech I wanted a quick spooler, but since I knew my old EFI system couldn't handle more than 250 hp, I was more concerned with having something that spooled up quickly than something that made max power. Things had changed, though, as my new compression ratio would take care of the low end response. If I wanted to make another 100 hp over what I was making before, I needed a turbo that could move some more air!
I called up Turbonetics and told them what I had (T3/T04B ball bearing turbo with a Super S compressor, -72 turbine w/.36 A/R), and they confirmed that that combination would spool up real quick, but would top out at 250 hp, max. That jibed with what I had been experiencing, so it was time to *really* cash out the poker bank roll, and order a turbo that would be a proper match for the rest of the engine: a T3/T04E ball bearing turbo with a 50 trim compressor and a Stage II, .48 A/R turbine wheel. This combination is definitely good for 350 hp, and should be a great match for the other components. To make sure that the turbo would have enough fuel, I also ordered (from another vendor) the "small" Bosch electronic fuel pump -- the 580, little brother to the 10208. Whew -- let me tell you, THAT was an expensive morning. And that's about all of the speed I can afford for a while -- the bank is tapped, so this combination had better live up to its specs, which I reckon to be about 350 hp at the crank.
Now, if I can just find the time to put it all together, and get it to the dyno shop without busting any other parts, we'll see if "the little engine that could" can actually post some numbers I can be proud of.
Look for another update by the end of April, by which time I hope to have all of the parts installed and take the beast back on the road.
|
|
|
The new engine roars to life! (01/21/01)
Well, another month and more steady progress on the truck. Maybe not as much as I had hoped for, but things have been very, very busy at work, and I haven't had as much time or energy to devote to the project as I wanted. And we are, after all, expecting a baby in March (our first!) But enough excuses... Let’s see, when I left off last month, I had just returned home with the engine, and was looking forward to installing it. I’m glad to say that the installation was pretty straightforward, and the engine went in in a couple of hours and got hooked up over the course of about two weeks -- not real quick, but, well, these things can take time. This in not nearly as simple as hooking up a 22R or 22RE - the aftermarket turbo plumbing is a bitch to bolt together, and it all has to be installed in just the right order, or it won't go together at all. And there was new stuff to plumb and wire as well. Anyway, as I said, the final bits took several days longer that I had thought they would, but I got everything finished and filled the engine and radiator with fluids at about 7 pm on Sunday night, Jan. 7.
The following morning, my heart pounding, I went to start her up for the first time since mid-October. I was so worried about turning that key that I was up late the night before going over things in my head, trying to make sure I hadn’t forgotten anything or messed anything up. With all of the money and time I had poured into the engine, I had a lot to think about...and since I didn’t want to start the engine for the first time at night, I had all night to worry about it...
Anyway, at 8:00 am I hooked up the battery and nervously put the key in the ignition. Man, had the dash gotten dusty in the intervening three months! And it felt odd to be looking OUT the windshield after months of looking at it from the engine compartment. I wanted to prime the oil pump and fuel system before I ran the engine in earnest, so I pulled the plugs and got ready to turn the engine over. This was really it: if we had screwed up an oil control ring or made some other (unlikely) mistake, I would trash the motor as soon as I hit the key. Swallowing deeply, I hit the key and waited for the gauge to build some pressure. About 20 looooong seconds later, the gauge came up, and I was ready to put the plugs in and do this for real.
With the plugs in, I hit the key listened to the engine come to life. May, that was something! Starting an engine that you rebuilt (or helped rebuild) is just so gratifying, I'm sure it's addictive. Anyway, I proceeded to break it in -- 30 minutes of constantly varying 2000-3000 rpm gyrations -- and watched and listened for any obvious signs of distress. After 30 minutes, I shut it off and took a look under the hood. Hmmm...I had a steady oil leak from my newly plumbed remote Oberg/Racor oil filter (my fault: overtightened reducer bushing), so I shut the engine down and pulled that assembly while I put the old parts back in. I'll get the new filter in eventually...
So, after 30 minutes of break in, and 45 minutes of filter wrangling, I was ready to change the oil and take it out on the road. Woo hoo! The thrill of pulling out of the driveway and actually motoring down the road was awesome! I drove the 25 miles to work with my eyes constantly sweeping the gauges, both elated and worried, expecting things to somehow, y'know, stop working or something. But there were no surprises, and the new motor ran like a champ!
The next 400 miles were very, very difficult, as I wanted to fully break the motor in before I found out what I had, while at the same time I **really** wanted to nail that pedal to the floor and feel the engine make some POWER. Restraint won out, for the most part, and I just tooled along for 500 miles -- never brought the engine into boost, never brought it above 4000 rpm. In retrospect, I might have done things a little differently -- late in the break in phase I discovered a lean condition at cruise that I wish I had spotted a little earlier, as I inadvertently let the exhaust gas temps climb higher than I should have for longer than I should have -- but the motor is built like a tank, and it doesn't appear that I've damaged anything. So, after 400+ miles, I declared the motor broken in, and it was time to see what I had under the hood.
I found out two things right away: 1) this engine had the potential for *a lot* of power, and 2) my tweaked and modified stock EFI system was in no shape to safely control this engine. Yep, no question about either point: if I wanted this engine to work like God and Tim intended it to, I would have to get that Speed Pro computer hooked up ASAP. The modified stock setup I was using (470 cc/min injectors, 5MGE (big body) AFM with 22RTE traceboard, and stock 22RTE computer), was not well matched for safely powering this engine all the way to 300 hp -- too many holes and weird spots in the various fuel and ignition maps. For 200+ hp, the setup performed without any major problems, but when I tried to make any real power, I would either hit fuel cut or see my exhaust gas temps rise to dangerous levels. Neither one of those is any fun. Make no mistake, though: this engine wanted to make some power! Clearly, though, it would be foolish to keep pounding this engine with a bad setup when I had a kick-ass replacement computer ready to install. Sigh...time to take truck out of service again while Phase II got underway.
So that's where we end this month's installment: on the cusp of the new computer install, and (hopefully) on the cusp of having a properly tuned, properly fueled 300 hp motor. I spent the weekend (1/20 & 1/21) working on getting the new computer into the truck, and I've made a lot of progress: I have it mounted (found a great place behind the fan assembly crossover tube on the firewall on the passenger's side), and have the fuel rail off and a lot of wires strewn about. My wife says that it looks like a pipe bomb exploded inside the cab -- virtually the whole dash is out, and parts and wires are strewn everywhere. I have several more days of work to get everything wired and ready to go again, but this is generally easier than getting the motor in, and I hope that if I devote a couple of nights to it this week, I can have it ready to run off the new computer by the end of next weekend.
So stay tuned. I think the next installment will be an interesting one, as I'll either be getting the computer tuned (which means some dyno numbers and real driving impressions) or cursing at myself for wrecking a perfectly good engine! Either way, it should make for some interesting reading!
Got me a motor! I take possession of the beast (12/17/00)
Wow, hard to believe a month has gone by, and until yesterday I didn't have a whole lot to show for it. Happily, though, I can report that I NOW HAVE A MOTOR AGAIN, and am a lot closer to being back on the road.
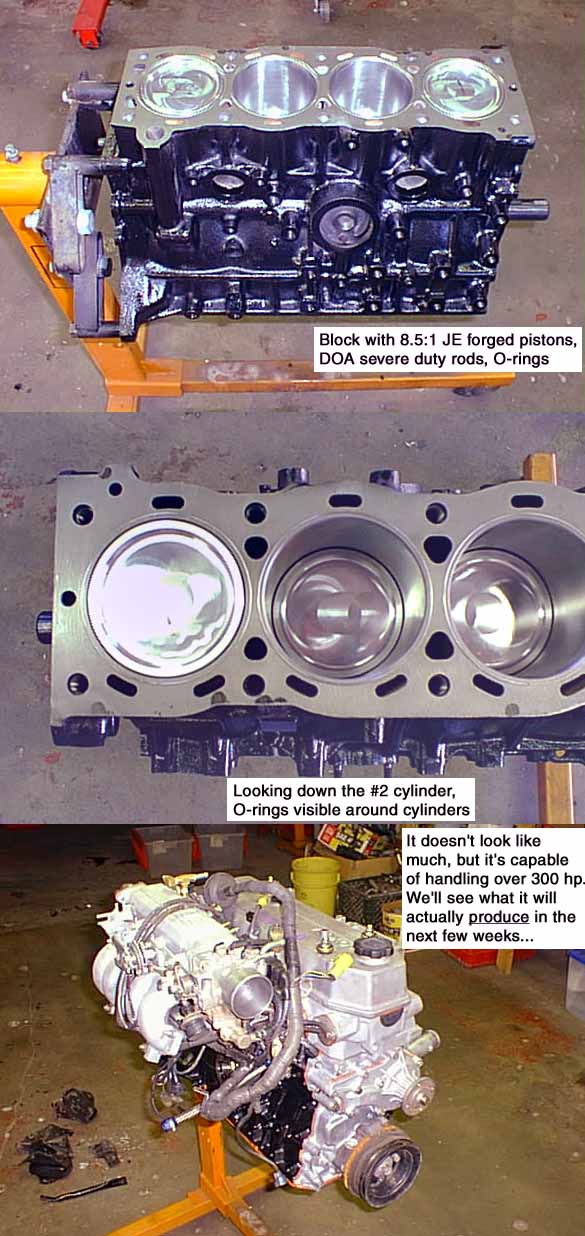
On Saturday, I met up with Tim @ DOA and had a chance to look at my block, pistons, rods, crank, and head for the first time. WOW! Beautiful stuff, as you'll see in the accompanying photos.
The block is a work of art! The pictures don't do it justice. Luckily, we were able to reuse my stock block and crank; for the sake of integrity at our planned high power output, Tim didn't want to turn the main journals more than .010", and he didn't want to bore out the cylinders more than .030" over stock. We were lucky on both counts, and were able to reuse the stock block and crank. Saved some real money there :-)
Tim's whole philosophy in building higher output engines is to let the engine fight itself as little as possible. In this case, that meant making sure that all of the cylinders were concentric to the centerline of the crank and rod journals (align bored/honed), that the deck was perfectly true and smooth, that the crank main journals were line bored for trueness, and that the rods were all balanced and phased (exactly the same length between the big end and the piston end). As a finishing touch, Tim had the block O-ringed. No more headgasket woes for this little engine :-) He used several different machine shops to accomplish this, as some excel at one operation but aren't equipped to do the others. The result is visible in the photos below, and should be evident in a big way when I get it up and running :-)
Some more info on the internals:
-
The pistons are 92MM JE forged aluminum wonders, very light, at a true compression ratio of 8.5:1 with my rods, block, and head. L-i-g-h-t, and very strong, with spiral locks on the wrist pins.
-
The rods are D.O.A.'s severe duty steel rods, which are virgin stock rods that have been nitrided, stress relieved, and shot peened. VERY serious hardware, well suited to life on the street.
-
The crank has been hardened, and the oil holes enlarged a little and chamfered (this was done through out the block, too). The 22RTE (and R/RE?) cranks are a forged steel crank, so there's some very good parts to start with.
-
For the head, we were able to reuse my LC "Pro EFI" head after all. The chambers had cracked in the narrow space between the valve seats, but the cracks were stable (we pressure tested the head to 50 psi), so we reused what I had. Tim made a pass at the head to change the flow a little, installed new bronze guides and V6 valve seals, did a valve job, and equalized seat pressure to 95 lbs. We also drilled my intake rockers to improve oil coverage on the exhaust cam lobes, as explained here.
Anyway, take a look at the pitcures below. I think they tell a pretty good story :-)
I have almost all of the other parts, and am just waiting on the flywheel, limited slip diff, and turbo header (which is being repaired, but more about that later).
I hope to get the engine installed next weekend, and maybe get it running then, too (on the stock EFI computer). After I break it in, I'll switch over to the Speed Pro unit, set up some dyno time for tuning, and see what this baby is 8really* capable of doing :-)
So maybe next month I will finally have some numbers (and driving impressions) to share. Stay tuned...
Part 2: My money flowed like wine (11/18/00):
A note to anyone who's been following my progress vicariously, and may be planning similar modifications for their own truck: assembling parts and getting work performed takes TIME! I'm now about a month into the project, and other than spending a lot of money, there hasn't been all that much progress.
The old long block was shipped down to D.O.A. Racing Engines, where it was disassembled. Tim found that I had managed to glaze the stock rings, something that I think happened when I was "experimenting" with the Link AFM setup last year -- too much fuel in the cylinder, which (when ignited) burned off the oil that was lubricating the rings, and the rings quickly polished their faces on the cylinder walls. So I've been admonished to "make sure (you) get it right this time." Heh -- I'll try. Otherwise, the block looked pretty good -- a bit of wear on the rod bearings, but virtually no wear on the mains. And no broken rings, which was something I was worried about. So after disassembly, the stock block checked out OK, and was sent off for machining.
The stock head was found to have some very small cracks between the cylinders -- not enough to prevent it from passing a pressure test, but enough to make it unsuitable for high horsepower use. So we're waiting for Tim to get some more turbo head cores in, which will hopefully be any day now.
All of the other engine parts (new pistons, rings, rods, etc.) are in, so we should be able to put everything back together within a couple of weeks of Tim getting a suitable head.
Since I'm already dropping a boatload of money into the engine, I figure I might as well address some other things that have been bothering me with the truck, and try to make a clean sweep of things. Soooooo...the truck is now getting the following additional parts:
-
ACT street/strip clutch (heavy duty PP, OEM-style disk, for easier street shifting). This setup is supposed to be good to 290 ft. lbs. of torque, so if I manage to overpower it I'll know that everything else I did was successful ;-)
-
PAECO aluminum flywheel. The stock 22RTE flywheel is 25 lbs., and, like the R151F's very low first gear, this was another one of Toyota's ways of getting these trucks motivated from a dead stop (hey, with a stock CR of less than 7.5:1 and a laggy turbo, they had to do something...) With the power that the engine will be making, I shouldn't have any problems getting this truck to move, and since the turbo engine will breathe best in the 3k - 4.5k range, I'd like to see it spin up there as quickly as possible. Unfortunately, no one that I'm aware of still makes an aluminum flywheel for the 22RTE, which uses a 236mm clutch/pressure plate (the other 22R-series engines use a 224mm clutch/PP). That led me to PAECO, which will make an aluminum flywheel from any stock flywheel you send them. Not cheap, unfortunately. Anyone else who wants to go down this path may be better off switching to a 22R/RE flywheel, for which there are several aluminum offerings, and a 22R/RE clutch and PP, which are not only cheaper but more widely available, with more "severe duty" options. Of course, there are some non-organic setups available, but I think for street use I want something I can slip a little.
One other interesting note: The 22RTE/R151F uses the same clutch disk and pressure plate as the 5M-GE and 7M-GE Supras (but not the same as the 7M-GTE). I don't know if the flywheels are the same...but I couldn't find a cheap flywheel for those engines, either, so it was moot.
-
Wrangler Power NW 110 amp alternator. Wrangler Power takes the stock ND alternator and completely rewires it, so this is a direct bolt on affair. They are not the only ones who do this -- EGR Products is another shop that is will rewind your stock alternator for output up to 100 amps, and will do it for about $100 cheaper than Wrangler -- but EGR never returned my email, and Wrangler has a very good reputation, so they got my business.
BTW, many people recommend having a local shop do this work. I tried that, and you'd think that in Silicon Valley I could find a competent local shop that could rewind a friggin' alternator, but the one local guy I did find who was willing to do the work wasn't able to actually *do* the work. If you can find someone local who'll rewire one of these for you, go for it.
Just for the sake of completeness, there are other, cheaper ways to get a high power alternator into your rig, but all involve welding one or two new brackets. Since I'm welding-impaired, I opted to shell out some cash instead, but if you can weld, you can swap in either a GM or higher power ND alternator for $100 or less.
-
Jacob's Electronics Accuvolt (review here). EFI fuel pumps are essentially electric motors, and their speed (and hence output pressure) is directly controlled by the amount of voltage they receive. Unfortunately, even with a high power alternator, the voltage to a fuel pump can vary a bit, and this sort of variance can play havoc with fuel delivery when the engine is spinning high rpms and really depending on the entire fuel system to supply fuel consistently -- high boost/high rpm engines that run lean at the top end die quick and painful deaths. The Jacobs Accuvolt is a black box that supplies clean, user-adjustable *constant* voltage to whatever you hook up to it, even if the voltage being delivered by the rest of the system is being strained by headlights, A/C, booming bass, etc. It's capable of supplying a constant 16V output even if the input voltage drops to 9.5 volts. It comes in three power ranges: up to 25A, up to 50A, and up to 100A. I was able to find a used 50A unit for about $100, and I intend to use it to run the fuel pump from a steady 14.5V feed.
Kenne Bell (no web site) makes a product called the Boost-A-Pump that addresses this same problem, but also gives you a dash-mountable knob to control fuel pump voltage (and hence volume). Because I'm going with a completely programmable fuel computer, I elected to go with the Accuvolt rather than the BAP, but the BAP is another way to get more fuel to the injectors and address the weak voltage problem.
BTW, I've been told by Tim @ DOA (and Russ at RC Injectors) that the stock 22RE/RTE pump is capable of supporting up to 400 hp with enough voltage behind it...)
-
Mike Dixon's heavy duty 22R motor mounts. I've heard of people with big power 22RTE engines literally ripping the stock soft rubber mounts in two, and I like Mike's design better than the higher-priced NWOR offering. Tim prefers to use a torque limiting strap instead of harder mounts (which he says just transfer the stress load to the tranny mount), but these looked like a good solution to me, so I'm going to give them a try.
-
A 8" Supra limited slip differential (LSD). I made this choice because of my driving style and the torque this engine will be able to produce, not because I think this is a good choice for off-roading; it's not (although it does beat a stock open diff, which is what I've been running). Since I don't do any rockcrawling, and my off-road driving is limited to fire roads and forest service roads, I think this is a better match for a high horsepower street engine. These diffs are capable of standing up to 600 hp Supra engines, and while I won't be making anywhere near that much power, I didn't really want to find out if a TrueTrac would stand up to the sort of abuse I intend to dish out.
-
A 7.5" Supra LSD for the front. Hey, they're cheap at the local Pick and Pull, and the engine is out anyway, so this seems like an easy upgrade for me. Again, not as good as SoftLocker/ARB/TrueTrac/spool/etc., but better than an open diff.
-
Marlin Crawler's short throw shifter kit. This is one of those parts that addresses a long-time complaint I have with the stock shifter (it always hits the passenger's left leg...and the throw is a bit too long...), but it's not listed in Marlin's regular catalog. It took a lot of will power to keep from ordering a set of 4.7:1 TC gears at the same time, but given all of the other cash I've been throwing around, I just can't afford 'em right now.
Whew. Well, between those purchases and my earlier engine expenses, that used up my poker bankroll and then some. But as someone once said, if you were meant to hold on to money they would have put handles on it 8-)
I'll post another update in a month or so, by which time I hope to have everything back home in my garage, and a little more cash in my wallet.
Part 1: I need a new motor (10/20/00):
MAJOR upgrades are afoot, and cash is being spent at a furious rate...
The sneak preview: after 150k miles, the rings have finally said, "Enough!" and I can't say I blame them -- the last 60k miles have been pretty grueling. So...it's time to do things right. I've contacted Tim @ D.O.A. Racing Engines, and he's helping me cook up a killer motor:
-
J&E forged 8.5:1 pistons
-
DOA severe duty rods
-
ARP rod bolts
-
O-ringed block
-
nitrided crank
-
balanced, phased, etc.
A SOLID motor, up to the task of handling 20+ psi of boost. Tim is building it for me -- no false pride here -- and I'm very, very happy about that. Should be "strong like ox."
To put this motor through its paces, I'm finally springing for a good, aftermarket, standalone, engine management system (EMS). As of today, the winds are blowing towards the SpeedPro wideband O2 system, but things could change again before I'm done. But one is going in. Finally.
Stay tuned -- should be some interesting news to report by the end of the year. :-)
|
|
|
|
|
|
Last year's mods:
|
|
|
|
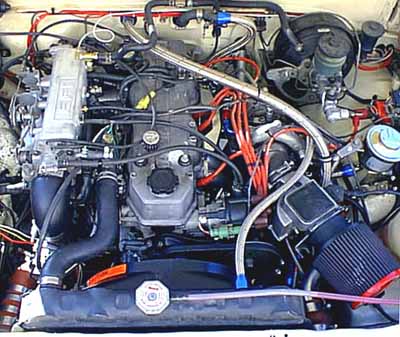
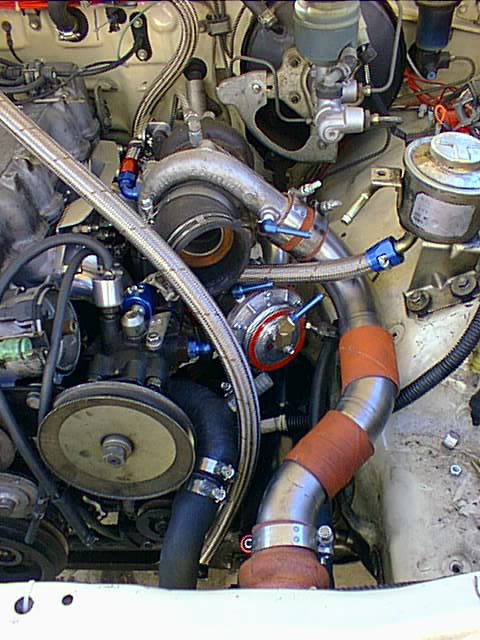
Here's a quick photo of the engine in a running state.
UPDATE: 1/03/2000
Well, the truck is back on the road! I've been driving it for a week or so, working out a few bugs, and am very pleased with it's power. I'm still running the hybrid AFM, so I expect to see another power rise once I get the MAP sensor in place and properly tuned.
All I can say at this point is WOW. :-) This engine kicks some serious ass...and this is on a 140k mile stock bottom end, with it's "thrilling" 7.5:1 CR. The power band is much, much improved -- it makes good power at almost any speed, from just over idle to 5k plus. I've been shifting and lifting at 5k, but it feels like it wants to keep pulling well beyond that. I don't want to jump on it too much until I get the EGT and fuel pressure gauges installed.
One slight disappointment: I had to pull the Flex-a-lite fan and replace it with the stock unit. The 22RTE's have a slightly thicker radiator than the 22R/RE motors, and the extra row eats up all of the spare room between the fan and the bottom crank pulley. Oh, well.
12/01/1999
These photos are just snapshots of a work in progress.
Here's what you can see in the following pictures:
LC Engineering turbo header and downpipe (well, you can see the effects of it...)
Turbonetics Deltagate external wastegate
Late-style 22RE throttle body and upper intake plenum (which
eliminates the early-style air control valve, a notorious
acceleration bandit). The new TB is overbored 3mm, and the
plenum gasket matched. Contact Tim at DOA Racing Engines for
more info on this swap.
Earl's braided stainless hoses and hose ends
Here's what you can't see, but will be included in the finished engine:
Link ElectroSystems "AFM Link" MAP-sensor replacement kit
(and/or HKS FCON and fuel cut defender)
Setrab oil cooler
HKS EVC EZ electronic boost controller
Flex-a-lite "Black Magic" electric fan
Auto Meter oil temp, water temp, fuel pressure and EGT gauges
(actually, the oil temp and water temp sensors will share the same
gauge with an A/B switch)
Kenne Bell "Boost-A-Pump" fuel pump voltage regulator
As they say, a fool and his money...will quickly be buying parts online!
When I'm finished, the engine's gonna be making a lot more power (or I will have wasted a good deal of time and money ;-). How much more? We'll wait for the dyno to tell the tale...
Thanks for stopping by. I intend to have everything done and running before the first of the year. I'll post some dyno number as soon as it's tuned.
Jeff
12/3/99
Click on the images below to enlarge them.
|
|
|
|
|
|
|
|
|
Return to Table of Contents
|
|