Changing to a bigger turbocharger
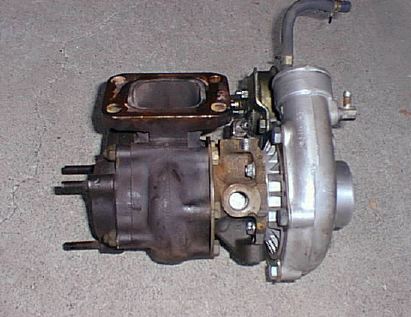
The T3/T4 hybrid turbocharger.
Overview: So you want to add a bigger turbo?
As most 22R-TE owners know, or at least instinctively realize,
the CT20 turbo that comes stock on the 22R-TE is pretty limited:
it has a lot of lag and it doesn't make a lot of power. It's also
EXTREMELY expensive to replace (around US$2500 for a new unit;
~US$1000 for a rebuilt unit). Since there are many better turbochargers
out there, this is one of those upgrades that seems to make a
whole lot of sense for both cost and performance.
It's not for the faint of heart, however, as changing the turbo
has significant ripple effects. Your exhaust and fuel system must
be up to the increased load, and, if you're planning on running
more than about 6 psi, you will need an intercooler. Note, too,
that this is not a weekend project.: There's no kit for this upgrade,
and while there aren't *too* many parts that have to be custom
made or modified, your ride will be down for several days, minimum.
Where possible, I’ll give you the part numbers for adapters and
fittings...but there were a few places where I just got lucky,
especially with some junkyard items, so you'll have to be ready
to improvise to get all the little pieces you'll need
Getting the turbo
Luckily, there are plenty of better turbos out there. The one
I went with is a Garrett T3/T4 hybrid, which is a perfect size for a 22R-TE that's not
in a dedicated race vehicle.
The T3/T4 turbo is called a hybrid because it has the turbine
housing of a Garrett T3, (the same turbo used on the 2.3L turbo
Ford Mustangs), and the compressor housing of a Garrett T4. This
combination of parts allows the T3/T4 to spool up quickly and
while pumping a larger volume of air than a straight T3.
New T3/T4 turbos cost around US$700. I got mine used for $400,
including the adapter to mount it to the stock exhaust manifold
(more about that in a minute). If you can't lay your hands on
one, or simply want to do this as cheaply as possible, search
out a used T3 from a wrecked Mustang. You can find ‘em cheap --
often for less than $200 -- and they are good units, easily capable
of outperforming the CT20.
Another option:
If you want the increase jn power but don't feel like putting all of the pieces together yourself, there is another option. The Turbo Engineering Corporation makes a Garrett turbo conversion kit for the 22RTE. The kit includes a bigger turbo, downpipe, and other necessary hoses and pipes. David Rees, from the Old Celica Club mailing list, has been kind enough to post a scanned copy of a Turbo magazine article describing the upgrade, with pictures and performance results. If you're into older Celicas, you might want to check out his Celica page.
You can request more information from TEC's Michael Franke at mfranke@turboengineering.com, but I haven't found the email response to be all that speedy. A better bet would be to call them at 1-800-950-8872. Ask for Jason, who owns a modified 22RTE truck and seems pretty happy to describe the benefits of their upgrade.
If I had found these guys before I started my own project, I might have used their kit instead.
Mounting the new turbo to the stock exhaust manifold
*News Flash (10/15/99)* L.C. Engineering is finally distributing the turbo header they've been developing since early 1999. I recently purchased one, and will post some more info on it as soon as I get it installed. Initial impressions: good design, so-so execution (some very sloppy welding), steep price ($895, plus cost of external wastegate).More details to follow...
In order to mount a different turbo to the stock manifold, you are going to need an adapter plate. I didn't make the adapter plate I'm using; it was made by the guy I bought my turbo from. However, before I installed the turbo I took some measurements, listed below, so you could have one made by a fabricator or a machine shop (or make it yourself, if you have access to the appropriate tools).
A word of warning about these measurements: I've tried to be as accurate as possible, but this is the sort of piece that requires that you have the manifold AND the turbo at hand. I think my measurements are a good place to start, but you should double-check them against the actual parts. Also, pay attention to the thickness of the adapter plate, as there may not be a lot of room between the wastage's vacuum actuator diaphragm and the rod that connects the steering wheel to the steering gear box.
TIP: Ford makes a very good Garret T-3 turbo-to-exhaust manifold
gasket, p/n E3ZZ-9450-A, intended for 1986 Ford Mustang SVOs (and
maybe other years). Cost: a whopping $6.74 from the local Ford
folks.
The wastegate
As you probably know, wastegates come in two flavors: internal/integral
and external. I don't have any experience with external wastegates,
although I hear they are generally more accurate and more capable.
The stock CT20 uses an internal wastegate, controlled by a vacuum
actuator. It would be great if this unit bolted to the T3/T4 housing,
but it doesn't -- major modifications would be necessary, and
you most likely wouldn't be able to use the unit again on the
CT20 if you needed to.
There are a lot of Garrett turbos out there, however, so a trip
to a good Pick-Your-Part junkyard should allow you to piece something
together. In my case, I found a junkyard in Hayward, California,
that literally had a BIN of used turbos. I picked through it and
scavenged some different vacuum actuators, brackets, and miscellaneous
small parts. For $15, I got two vacuum actuators, two brackets,
two pushrods, and a generous handful of bolts, fittings, etc.
Note: If you decide to get a *turbo* from such a bin, make sure
it spins freely and has no appearance of rust. These things spin
at over 100,000 rpm, so any flaw in impeller material or bearing
will reveal itself dramatically. Remember that there are certainly
places to save money in a project like this, but the turbocharger
itself is probably not one of them.
Be prepared to modify whatever you find to get it to fit your
turbo. My actuator mounting bracket needed to be reversed and
machined to accept the vacuum actuator I ended up using. I also
needed to cut down the actuator's pushrod so it reached the wastegate’s
arm at the right length. The “right length” means that the wastegate should be tightly
shut when the actuator is in it's “relaxed” position. Take the
time to get this distance as close to perfect as you can manage,
because a loose wastegate will never allow you to build any power.
Finally, be aware that there won't be a lot of clearance between
the vacuum actuator's mounting bracket and the rod that connects
the steering wheel to the steering gear box. When I bolted it
all together I found that I had to trim another 1/2 inch off my
mounting bracket to get things to clear; in fact, I had to install
the bracket and actuator AFTER I bolted the exhaust manifold to
the head, as there wasn't enough room to maneuver everything into
place when it was fully assembled. Just something to keep in mind...
The bearing water jacket lines
These are pretty straightforward. I used some 3/8 inch hose barbs
on 3/8 inch tapered threads, and a couple of standard brass 90
and 45 degree fittings to bring things out to the angles that
I wanted. No surprises here, but be sure to use either Teflon
tape or pipe dope on the threads.
The oil feed line
This is pretty straightforward, too, with one caveat: the stock turbo uses a banjo bolt with a thread pitch of 12MM X 1.25MM. This is NOT a common size, but Earl's makes exactly one fitting that's a match: a carb fitting that has this 12MM X 1.25 MM pipe thread on one side and a standard -6 A/N fitting on the other, with a crush washer (!) in between. (UPDATE, 5/24/2010: Apparently, I've had this size wrong for years -- I had it as 10mm X 1.25, but it's not, it's 12MM X 1.25. Also this page on the Pegasus Racing web site has a ton of 12mm adapters, which should make things easier.) The oil feed fitting on most of the Garrett turbos is a female 1/8” tapered pipe thread hole; on mine, there was a 90 degree 1/8” to -4 A/N fitting installed, so I just needed a reducer to go from the -6 at the fitting on the block to the -4 at the turbo. It's important not to oversize these fittings, as you don't want to flood the turbo bearing (more on this below).
Also, remember that if you plumb this using braided steel line
(which you should) this line will eat through anything it rubs against. Consequently, this line should be the correct
length and shouldn't rest against anything, including the turbo
housing.
The oil return line
Every project has its crux: the difficult spot that must be overcome
for the project to succeed. If you can't solve the crux, you must
turn back. For me, the oil return line was just such an obstacle.
Here's the most important thing to know about turbo oil return
lines: unlike the feed line, which is pressurized, the oil return
line relies on gravity to get the oil back into the oil pan after
it has bathed the turbo bearing. If oil doesn't drain back quickly
enough it swamps the bearing, and can work its way past the turbo’s
seals. This leads to oil contaminating the intake tract, oil coking,
and ultimately seal failure. Ideally, the oil return line should
be a straight shot back into the oil return boss in the block
(or pan, if this is not an OEM turbo setup).
Turbonetics makes an aluminum oil return fitting that fits both
the T3/T4 (and probably other Garrett oil return openings) AND
the Toyota block. It's Turbonetics part number PN 20259, and is
available in 1/2 inch NPT (or PN 20382 for 3/8 inch NPT). You
can get this from Performance Techniques -- follow the link to Installation Accessories. (A word about
Performance Techniques: they have a lot of useful stuff, including
new turbos, intercoolers, hose connectors, etc., but they ONLY
ship COD -- and they ONLY take cash (personal checks not accepted).
I've never had a problem with them, but I'm used to businesses
that take credit cards...but I digress.) I picked up two of these,
one for each end of the return line. Unfortunately, I had a hell
of a time plumbing the gap between them; it was just too close.
Too close to use braided steel hose and too close to use hard
line and flared fittings. After hours (no exaggeration) of staring
at it, I finally came up with a combination of Earl's fittings
and brass plumbing fittings that spanned the gap. The drain angle
is a less than ideal, but it was the best I could do. This is
definitely a case where access to narrow radius tubing bender
and a TIG welder would be very, very helpful. (And some day soon
there will be a picture here to compliment this description.)
The down pipe and O2 sensor
I had my truck towed to a local muffler shop to have the down
pipe bent up. I'm not thrilled with the job the guy did, but it's
serviceable for now. I may have this piece redone by the guy who
did the rest of my exhaust; he does outstanding work, but towing
to his shop would have been prohibitively expensive.
As for the O2 sensor, be aware that the stock location is in the
turbo housing; you'll need to have a fitting welded in to your
new down pipe. This might be a good time to convert to a heated
three wire sensor: they're cheaper ($60 vs. $130) and allow you
to use industry standard weld bungs. I’d had another O2 sensor
installed when I added my Halmeter Air/Fuel Meter, so I just tapped
into its signal wire.
Other odds and ends before initial startup
• Remember to fill the turbo with a little bit of oil (inserted
manually via the oil feed line) before you tighten the line’s
fittings. 10cc - 20cc is about right. This coats the bearing at
initial startup.
• The T3/T4 is both a little noisier and a little hotter than
stock. Retain as much of the factory heat shield as you can.
• For anything more than about 10 psi you're going to need an
intercooler, even if you didn't need one with the stock CT20.
Driving impressions
The T3/T4 moves a lot more air than the CT20, and it spools up
much more quickly, too. As I said above, it's noisier and a little
hotter, so it's important to make sure your cooling system is
up to snuff - I'm still keeping an eye on mine, and despite some
initial fears it seems to be doing a good job.
Power and responsiveness have increased throughout the engine's
range. I'm currently running a bit more boost than I did before
(15 psi vs. 13 psi) and I may run even more -- perhaps 17 psi
. I have yet to detect any detonation, and the bigger injectors
(I installed RC Engineering 320 cc/min Lucas style injectors) are easily keeping up with
things so far.
About the only area that I find lacking is the fuel mapping table
of the stock ECU. I've been having a difficult time getting the
air/fuel ratio dialed in correctly, something I’ll cover in more
detail in the article on the bigger injectors. Suffice it to say:
if I can solve the air/fuel ratio problem, I should see another
15 hp or so, as I think I'm easily losing that much to a sloppy
mixture.
The bottom line: this is a very good swap. This is an engine that
responds well to a bigger turbocharger, and the T3/T4 fills that
role very nicely.
Added note: it is now November, and I've had the truck on the road with the new setup since early August. The T3/T4 kicks ass! I still don't have the fuel table problem sorted out to my satisfaction, but I'm not lacking for power. My engine makes 175 - 185 hp, by my estimate -- numbers I hope to back up with dyno time in the future -- and I'm really happy with the way it runs.
My above fears about added heat and noise seem a little overstated. I'm still running the stock fan/fan clutch, and the engine isn't running any hotter than it was before. Some of my initial impressions were made before I had reinstalled the stock heat shields, and I was surprised to discover what a difference they made when I put them back on. As for the noise, well, it's more like the sound of performance -- a feature, not a bug.