
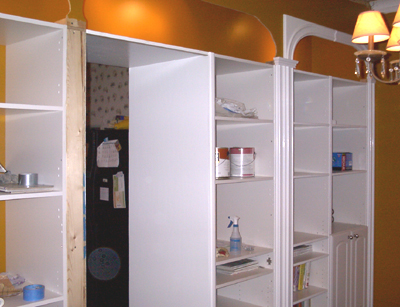
The image on the left is a view of almost all the dining room cabinets. There are three sets--a pair of cabinets on the left (partially visible), a pair on the right, and the middle set is one cabinet and an doorway. Each set has an arch over the top of it (there are lights behind the arches). Eventually, all of them received trim, but as of this photo, the intended trim had only been mounted on the far right set. This page shows the trim originally purchased for the job, and (at bottom) what I ended up installing instead.
The image on the right is that far right set (pair) of cabinets with the originally intended trim. The vertical trim on the left side of the image separating this set from the middle set was quite wide. The width of the trim overlapped some of the face of one of the cabinets in this set. Thus, the middle of the pair of cabinets was off-center relative to the arch trim above them (which was centered over the wide vertical trim). You can see the gap in the arch trim--that's where a "key" should go.
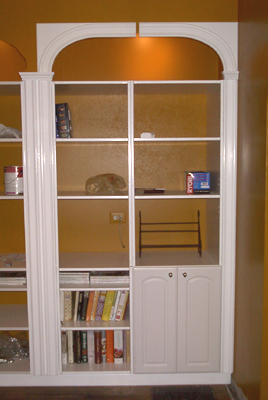
As you might be able to see, I put up some very simple low-profile trim to try to minimize the visual impact of the middle of the pair of cabinets. I considered making that trim unnecessarily wide, in order to center it under the arch (wasting some space in the rightmost cabinet), but that approach can't be taken all the way to the floor, because of the doors at the bottom. I considered painting that vertical trim the same color as the walls, but the insides of the cabinets, except the backs, are white (as you can see in the left photo) and it might have looked odd to put colored trim on the front. I also considered moving the "key" of the arch off-center. Ultimately, I didn't do any of that. The solution is at the bottom of the page.
Meanwhile, there's a picture of the Installation Crew below. From left, it's my stepfather Bob, my brother Ross, and myself. All quite tired at that point.
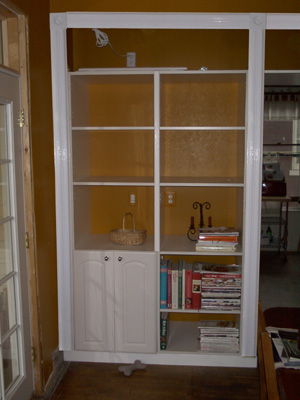
The above picture is a mockup of what the cabinets ultimately looked like after I used a completely different type of trim. I photoshopped this together before actually using the lumber. This shows custom-milled lumber that matches what's in the rest of the downstairs of the house. It's a lot less fancy looking than what I originally bought, but it completely solves the symmetry problem. And it matches. One disadvantage is that it makes the archways above the cabinets rectangular rather than curved. Identical trim was later attached around the french doors on the wall to their left (left edge of photo). In fact, the top of the arches came out to the same height as the top of the french door assembly.
Main page.
Home Improvement pages:
The living room window trim and paint.
The fireplace we had we had reconditioned to burn wood again.
The dining room floor repair and paint colors, and preparation for the cabinets.
A set of cabinets we installed in the dining room.
A set of French doors installed between our dining room and back porch.